MTR:Custom BVE Train Sound
Views
Actions
Namespaces
Variants
Tools
Draft
This article is a work in progress.
Informations might not be complete and will be improved overtime.
Note: This tutorial only covers BVE4/OpenBVE Sound
Prerequisite
- Basic knowledge of adding custom Minecraft sound and the json format.
- An existing BVE4/OpenBVE Train
- An Custom MTR Mod Trains (Livery included).
- Software that is capable of exporting .ogg file (e.g. Audacity)
- Bulk renaming software (e.g. PowerRename with PowerToys)
Process
- Make a copy of your BVE Train
- Find the directory of the sound folder, they're either located right in the BVE Train Folder, or there might be another Sound Folder. (They usually contains bunch of .wav file)
- If you find another sound folder, put all the sound file inside to the BVE Train Folder.
- Delete all files except .wav, train.dat and sound.cfg.
- Rename all files in that folder to lowercase letter file name, you can do it with any bulk renaming software, or by manually renaming each one of them
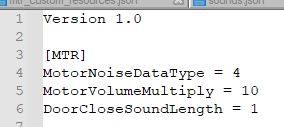
- Add the following to sound.cfg, below
Version 1.0
[MTR]
MotorNoiseDataType = 4
MotorVolumeMultiply = 10
DoorCloseSoundLength = 1
The end result of sound.cfg should look something like this:
 7. Rename your train folder to be lower case and without space. (You may use underscore to replace space)
This will be your sound ID to reference.
8a. Import all the sound to any audio editor and convert them to Mono Channel
8b. Export all the .wav/.flac file to .ogg file.
(For Audacity user, use File > Export > Export Multiple, and choose Ogg Vorbis Files)
9. Copy the train folder to Your Resource Pack/assets/mtr/sounds. (Make the folder if it doesn't exist)
10. Make a sound.json file in Your Resource Pack/assets/mtr if you haven't already, an example could be found here.
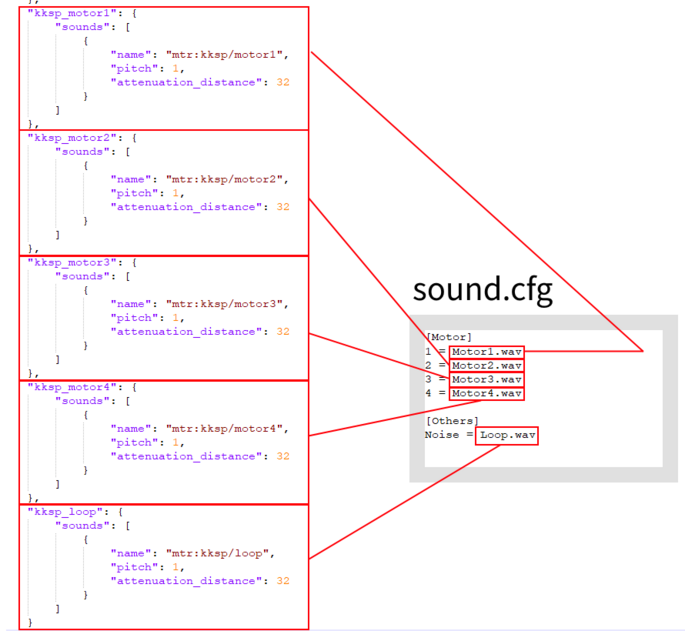
11. Make a sound entry in sound.json of every file in sound.cfg, the ID should be sound_id_filename
Your sound.json in the end should look something like this (I used kksp as my train folder name):
 Finally, add the following line to your custom train, replace
 soundID to your actual sound ID/Train Folder Name
"bve_sound_base_id": "soundID"
Your train in mtr_custom_resources.json should now look something like this: Now start your game, and everything should work.
Notes
point.oggis played whenever the train crosses a rail node, which is different from BVE's behavior (Crossing a junction). If you feel the sound doesn't fit, please remove it in sound.json- Small motor noises will still be heard when coasting, this is to simulate train adding small bits of power to maintain it's speed.
- You can add
"const_playback_speed": trueto your train, this will make the acceleration play back at a constant speed no matter your acceleration.